Craft, stitchin' and sustainable living

Wednesday, April 7, 2010

What's new?

So Stitchybritt, what have you been up to?

Well, stitchin-wise, two things!

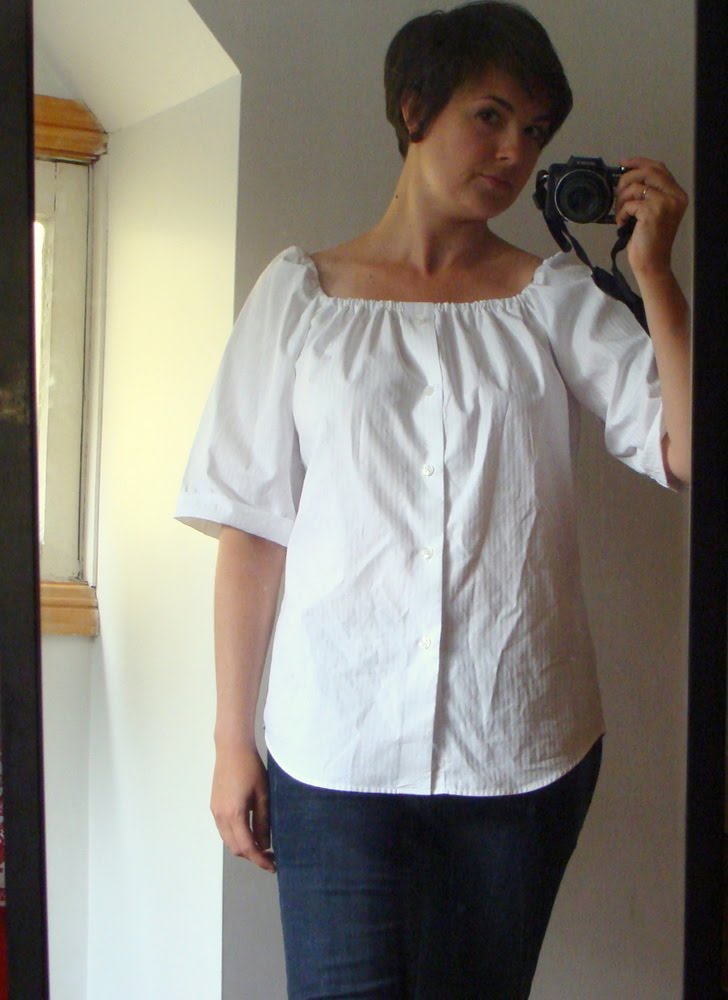
One: When Sam's housemate was getting rid of his suitcase, he was also getting rid of a bunch of unworn business shirts. I snapped up a bunch of them with refashions in mind. And here's the first -


Looks good, huh? I used the super-easy tutorial from Made By Lex - here. I left it the length it was, so that I can tuck it into skirts for work.


Two: I'm finally using the wonderful angora bunny wool that I bought in Scotland (once again: the bunnies are not harmed in the process), and knitting a cardigan. It's a ruffley one that I found on Ravelry. Ok so it doesn't look much at the moment, but I'm loving the softness and the vibrant colours!


And you, my dear friends, what have you been up to?

Friday, April 2, 2010

The new pad


We have safely arrived in Sydney, spent a few days unpacking and a few more days traipsing around to get the stuff we didn't already have for the house. Check out my new craft desk! Exciting stuff! Crafting recommences next week.

Oh yeah and this is some cool graffiti from down the street.

Sunday, March 21, 2010

Moving part 2


Uhh ohh... I found another WIP. This one is a dress that I cut out to be the same as my new year's dress, but never got stitched. I couldn't even bring myself to take it out of the bag, hence the in-bag photo. Thinking I might actually turn it into a top. Maybe.

Meanwhile, I'm living out of a suitcase until next Saturday when both my stuff gets delivered to my new house, and we (being boyfriend, the guinea pigs and I) move in. I snavelled the suitcase from the about-to-be-thrown-out pile from one of Sam's housemates. It's pretty cool and vintagey looking. The only thing is that it had an ugly old plastic luggage tag, so I cut that off and ordered a new one on etsy from Polyclarific. Look at it! It's so stitchy and cute and wonderful, exactly what handmade stuff should be like.


In other news, I've been knitting these cute little egg cozies from some wool from my stash.


I used Sqwish's Gnorman Egg Cozy pattern which I found on Ravelry. Not sure if I will keep them for our new house or give them away as Easter gifts yet. Hmmm...

Sunday, March 14, 2010

Moving

Holey dooley - Melbourne to Sydney move is coming up so quickly! In two weeks I will be moving into my new pad in Sydney's inner west, setting up my new craft desk, finding my new favourite wool supplier... eeek! Right now my whole house looks like a shrine to cardboard boxes. Packing up my crafty stuff was especially difficult - what if I suddenly get the urge to stitch me a new, um, something in the next two weeks? What will I do then? I did leave one knitting project out though, so at least I will have something to keep my fingers busy when I'm not working, studying, going to circus class, watching Deadwood etc.

One of the downsides of packing is coming across all the Works in Progress (WIPs) that were never finished. Some of them are years old. Ok, it's time to name and shame. Here are some that I came across today.

Exhibit A: Kusudama


This cute little box of folded things is due to become one of those amazing japanese origami ornaments. One day.

Exhibit B: Paintings

These two paintings got to a certain stage then were forgotten. I still like the designs (which were off the top of my head) but maybe not the background colour so much. Hopefully new Sydney house will have a perfect place for them to hang, and I'll be inspired to finish them off.

Sunday, March 7, 2010

The Social Studio


Yesterday I went along to the Social Studio in Collingwood, Melbourne to take part in one of their Re-mixed workshops. What a brilliant place! The Social Studio is a fashion store/design studio/cafe that assists young refugees to gain fashion design skills and employment in the industry. They source recycled and excess materials from the fashion industry and encourage community involvement in the many things that the studio does.

When I walked into the Social Studio I felt immediately at home. It has a really friendly, casual vibe and there are people from a whole range of nationalities and cultures which gives it a really exciting feeling. Our task for the day was to look through boxes of seconds clothing, choose an item (or items) that we liked and refashion it.

Being my first venture in the world of refashioning (and believe me, I've been visiting Wardrobe Refashion for ages wanting to have a go) I went with something easy and relatively plain. I took this black singlet and made it longer by chopping it off about 15cm from the bottom, sewing a piece of alternative fabric in between and then sewing the bottom of the singlet back on underneath. Simple, but came up looking pretty good and it is definitely something I will get good wear out of.

You want to know what's awesome? The Social Studio workshops, which run from 10am - 1pm every Saturday, only cost $30. For that you get all your materials, access to the industrial sewing machine and overlockers, and qualified teachers to help you with the tricky bits. Amazing. Not to mention the delicious vegetarian lunch I had in the cafe afterwards for $8. $8! And you get to take home whatever you make, of course.

If you're in Melbourne, you MUST check out the Social Studio!

Sunday, February 28, 2010

New to the Stitchybritt store...


New to the Stitchybritt store are these cute Lion Amulets, made to bring courage to those who can be a little shy. Maybe you know someone who needs a helping hand to speak up?

Monday, February 22, 2010

Stationery organiser tutorial


Ok, so, here is the tute for the stationery organiser that I made for myself a few weeks ago in the quest to tidy my desk (see previous post for the story). Is your desk flooded with bits of paper, envelopes, stickers and other madness? Maybe you need one of these!

Step 1: Buy yourself a case of Australian wine (believe me, Australian wine works much better ; ) ). Drink the wine and recycle the wine bottles. Hold onto the box.


Step 2: Get your wine box and hack it apart with a stanley knife. Be careful cutting towards you (I know you're thinking "yes mum!", but maybe this small reminder will make you think about it for a moment longer and thus save yourself a nasty cut). Cut the box into three neat panels, the two big main ones and a smaller side one.


Step 3: Stanley knives don't make for perfect edges, so I taped packing tape around the cut edges to neaten them out (I would have used masking tape but do you think I could find it under all the rubble on my desk?).


Step 4: Measure up your fabric against your cardboard. You'll need enough fabric to cover the front and back of the cardboard pieces (when they are laid side by side - with gaps so that when your organiser is sewn up there is enough room for it to fold neatly) and another piece to lay across, which will be the actual stationery pocket. I made my pocket about half the height of the cardboard pieces.


Step 5: Take your pocket piece and hem the top of it with a straight stitch. Add a second line of stitching if you think your fabric might fray.


Step 6: Sandwich your pocket piece in between your two outer pieces, with outer pieces right rides together. Stitch the bottom and two sides of your organiser.


Step 7: Trim off any excess fabric at the edges and then turn your organiser inside out. Hey! Looking pretty good! Push those pesky corners out with a pen or the point of your scissors.


Step 8: Insert your cardboard pieces. Find the 'gaps' between the cardboard and pin down the line. This will help you to hold your cardboard in place. With your organiser pinned, check to see that it folds properly. If it's a bit squishy in there - don't worry! - just trim your cardboard down a bit. When it's looking right, take the cardboard out and stitch your pinned gap lines.


Step 9: Nearly there. Slot your cardboard back in. At the top of the organiser, cut a line *almost* to the top of the cardboard. Fold the top bit of fabric in and pin in place. Now, stop right there. Think about the way that you're pinning. When you put it front of your sewing machine, can you pull the pins out the right way? Coz there's no way you're gonna get the cardboard side into the arch of your sewing machine. I am speaking from experience here people. Once it's all pinned and good, stitch it!


Step 10: Brilliant! Hopefully it looks and functions like a stationery organiser. Pop some paper, envelopes, stickers, whatever in it!


Step 11: Find your preferred way to fasten it. Ribbons, leftover bits of fabric, twine etc look good. If you want to get technical, you could have sewn a press-study bit into one of the side seams. Do what suits you.


Step 12: Enjoy a neat desk. Ahh : )