Craft, stitchin' and sustainable living
Monday, May 30, 2011
Martha Stewart HACK!
See this necktie? It's crafty, cute and has a funky little feature that allows it to tuck into itself, giving the impression of a very neat little knot. It also came about as a reconstruction of the Martha Stewart Knitted Neck Scarf, somewhat by accident.
You see, I started knitting the neck scarf, but quickly realised that I was going to run out of that particular yarn before it was finished, and there was no way I was going to be able to get more of this type (not to mention, I'm on a yarn and fabric diet at the moment). It turns out that I actually prefer this version! So, if you would like to make your own Martha Stewart hacked neck scarf, just keep reading below...
Firstly, you need to start knitting the Martha Stewart Knitted Neck Scarf, according to the pattern that is here. When you get to about an inch above the ribbed section, cast off and start knitting the same again. You can see where I suddenly ran out of wool - I'm very glad I stopped knitting and started on the other end when I did! Once you have two matching (or nearly matching) end pieces, you are ready for the next step.
Now you will need some fabric for the part of the scarf that will go around your neck. Best choose something comfy. I chose some fabric from an old top that I couldn't part with. You will need two rectangles of fabric, approx. 2cm wider than your knitted pieces and long enough to just circle your neck.
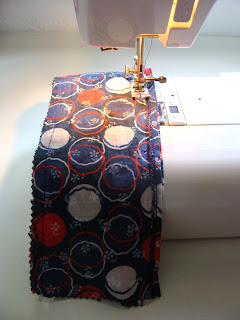
Pin your two rectangles together and stitch down the long sides to make a tube. The seam will be approx .75cm on each side. Now turn your tube right-way-out.
Now you will want to fold in the ends of your tube, and then tuck the ends of your knitted pieces in each end. Pin it and double check that it fits well around your neck. Adjust as necessary.
Stitch the knitted end into your scarf with a straight stitch running close to the end of your fabric. Do this on both ends.
And now you have a chic new neck scarf. Pretty sweet, huh?
Wednesday, May 25, 2011
Cupcake
This little cupcake sits on top of a gift which is for boyfriend's sister (Happy Birthday K!). Once again, I used the fabulous Amigurumi by Beth Doherty for the instructions of how to crochet this little sweetie.
P.S. I'm doing a bit of a stocktake of the Stitchybritt Etsy store, and have some new things going into the SALE section. Stop by and take a look, you might just pick up a bargain!
P.P.S. Do you like to read? Do you know about The Reading Room? It's like a social networking site for booky peeps. You can add me as a friend and we can see what each other is reading! Just search for Stitchybritt.
P.P.P.S. I made a treasury today, in honour of all those lovely Australians who live on the south island (Tasmania). You can see it here. Enjoy!
Thursday, May 19, 2011
More slippers...
Saturday, May 14, 2011
Mend and make do
Autumn is a good time for mending, because it's usually when you sort out your wardrobe (goodbye summer dresses, hello warm coats) and find all sorts of clothes needing all sorts of repairs. During my recent wardrobe clear-out I managed to make quite a big 'to-mend' pile.
The above is a skirt which has had a thread coming undone for years. For a while I picked at it everytime I wore it, then I just stopped wearing it. All because of a silly little thread. Now it's fixed, and will be worn again.
The below are two knitted hats, each a handmade gift from a friend, but both had stretched from wear and kept falling off. So I added an extra (smaller) crochet border to the pink one, and stitched some elastic into the rim of the white one. Now they are both wearable again.
I've also got some shoes that fit well but could use some tlc. Has anyone done any shoe repairs lately? I'm thinking of dying a light grey pair that have some stains.
Sunday, May 8, 2011
Mother's Day Slippers
I decided to crochet my mum some cute slippers for Mother's Day this year. Actually, I needed some slippers myself, so I made a prototype (based loosely off this pattern, but with a bit of ad-libbing) which I have kept for myself (pictured above). They are very comfy and warm and what's more - it uses up some of the yarn from my stash, which is quite big.
The below are the ones I made for my mum. They look a bit odd without feet in them, but they do fit the same way. My only recommendation - make them quite tight because they will stretch a lot!
Monday, May 2, 2011
The muslin bridesmaid's frock
Another sewing first this year - sewing a muslin! A muslin is basically a practice garment that you make to ensure everything fits. This is also my first time sewing from a real dressmaker's pattern (yes, on cardboard, not from tissue paper).
My friend Lucy's sister is getting married in about a month, and it was all hands on deck to help with the getting the bridesmaid's muslins ready for the dressmaker. This made me a little nervous, because although it was just a practice dress, I knew a professional dressmaker would be looking at my work.
And just to make things tricky, I was given a pattern, but no instructions. So I had to really think about how I was constructing the dress. Ok so darts first, then the umm... I hope I'm pinning this right...
... do I put the pockets in now? or later?
Thankfully it came together in the end, and of course I had to have a go at trying it on (excuse the dopey look on my face, I had just strained my brain to figure out an instructionless pattern).
It's made for a smaller lady than myself, but it was fun to try on anyway (and yes, it does go brilliantly with tights and socks, don't you think?)
Ta-da! I can sew from a real dressmaker's pattern, even without instructions!
Subscribe to:
Posts (Atom)